Want to use WiFi on your laptop but does not have access to any WiFi network? If you have a smart phone then it is possible to use Internet on your PC or laptop by using your android phone as WiFi hotspot. In this guide we will describe step by step method to use Google Android phone as WiFi hostspot.
Step 1:
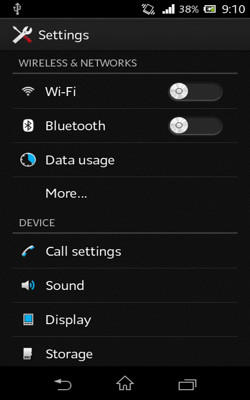
Open the settings menu from your Home Screen and look for “Tethering and portable hostspot”. It is usually located in Wireless & Networks section in the settings. On some phones you may need to tap “More…” to find it.(Like in screenshot show below)
Settings will look something like the one show below. Tap on more.
Step 2:
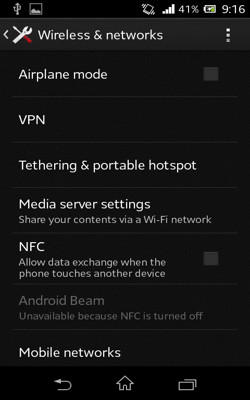
Now tap on “Tethering & portabe hostspot”
Step 3:
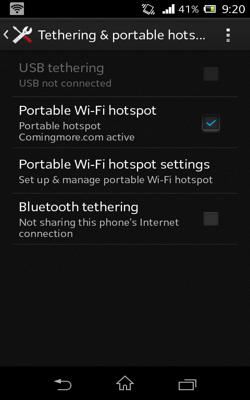
Check the box next to “Portable Wi-Fi hostspot”
Step 4:
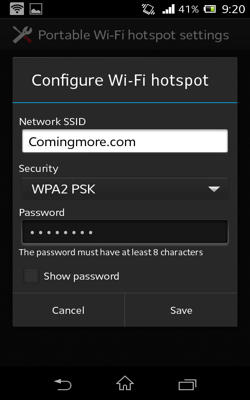
Now edit your Wi-Fi network name and password by tapping on “Portable Wi-Fi hotspot settings”. Tap on save after making changes.
Step 5:
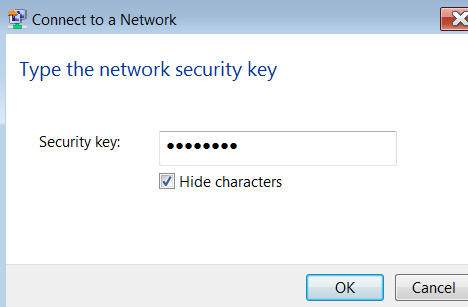
Now go to your PC or laptop and select your handset’s network from the available Wi-Fi connections. Click on connect and type the network security key. This is the same Wi-Fi password we set earlier in hotspot settings.
Its all done. Your are now connected with your handset and can use internet on your PC.
Wi-Fi hotspot Using Third Party Apps
If tethering is not allowed by your carrier or you can’t find “Tethering & portable hotspot” option in settings then you can use a third party app for this purpose. Look for WiFi tethering apps on google play store and install one of the apps to enable tethering.
Some carriers may block apps for WiFi tethering from their version of play store. If you are one of them then you need to download the APK file using your mobile’s browser and install it manually.
Data usage
While using internet on your PC using your phone you must keep an eye on data usage as it will burn more quickly then it does when you use internet on your phone. Data usage can be checked through the “Data usage” option in the Wireless and Network section.


